
고휘도 재귀반사 비즈(beads)를 사용한 의류용 원단
고휘도 재귀반사 비즈(beads)를 사용한 의류용 원단
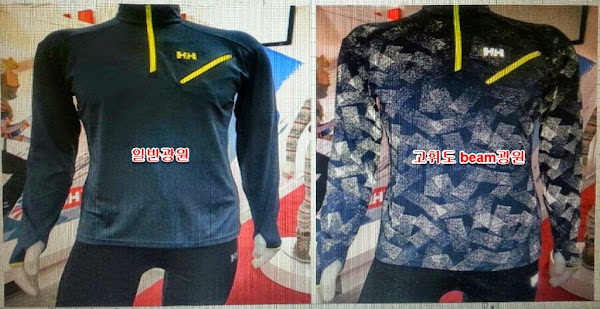
어떤 업체에서 이런 제품을 만들고 싶다고 한다. 아웃도어용으로 보이는데 이런 제품이 팔릴지는 의문이다. 하여간 필요하다고 해서 기술적인 요소만 분석해 본다.
참고가 될만한 아래의 바인더를 구입하여 사용하면 되겠지만 엄청 비싸다.
Binder
Difference between Optilux 505, 507 and 950 Transfer?
December 18, 2014 at 8:30 am
Comparing Optilux 505, 507 Enhanced, and 950 Transfer in regular light
What has been flying off our shelves lately in record numbers?
Yup, our reflective ink systems! We love this versatile ink, because the reflective quality gives it an element of surprise when the print is hit by direct light, as well as enhancing visibility at night. We’ve posted several blogs in the past to describe how the system works and how best to print the inks, but many of our customers have asked us to explain what the differences are between the systems.
Optilux® 505, Optilux® 507 은 모두 플라스틱졸이다.
The Optilux® 505 and the Optilux® 507 Enhanced Screen Printing Ink systems both are designed for direct screen printing and feature similar characteristics. However, the 507 differs in that it also contains metallic shimmer flakes to make the print look more silvery and shimmery when viewed in normal light. As you can see in the image showing the three systems in “Regular Light,” the 505 appears a bit darker in color than the 507. Both inks can be printed through high mesh counts, thus allowing for highly detailed prints to be rendered. Both inks have similar reflectivity values of approximately 50 candlepower (CP).
Optilux Comparison between 505, 507 Enhanced and 950 Transfer with Lightbeam Optilux Comparison between 505, 507 Enhanced and 950 Transfer with Lightbeam
On the other hand, the Optilux® 950 Transfer system is almost a completely separate reflective system. It consists of the 950 Transfer adhesive which is used to print the design in mirror image onto the Optilux® 901 reflective transfer sheet.
The 901 transfer sheet is composed of reflective beads temporarily mounted to a polyester sheet, with the reflective beads all facing the same direction. Thus, when the transfer is printed, cured and then heat-transferred to the substrate, the resulting reflectivity is very bright, approximately 500 CP!
Below is an image showing a 950 Transfer that was applied to a quilted down jacket. This photo was taken with a phone camera and flash.
Please Note: Currently, the 950 Transfer system is available by special order only.
Optilux 950 Transfer on a jacket. Photo taken with a phone camera and flash.
How To Print
December 21, 2010 at 10:22 pm 4
Optilux 507 printed over Discharge viewed in normal and focused light Our Optilux™ Direct Print Reflective products have been one of our most popular special effects inks due to their versatility as a stand-alone special effects ink and their ability to be incorporated as a design element with other inks as part of a print design. Recently, we have received a number of inquiries as how best to print our Optilux™ inks to achieve the maximum reflectivity. Here is our product manager, John Hatcher, with a more detailed how-to on these reflective inks: International Coatings produces two direct print reflective products, Optilux™ 505 and Optilux™ 507. The primary difference between the two products is that Optilux™ 507 is more opaque than the Optilux™ 505. For those that are primarily printing a one color print, or need more opacity, the use of the Optilux™ 507 Enhanced Reflective is recommended. The Optilux™ 505 is for use on designs where you may want the reflective ink to be a part of the design that is somewhat hidden until hit with light.
Optilux 505 used as a design element, shown viewed in normal light and at night under focused beam The printing of both products is very similar and it is important that the printing procedures given in this article are followed in order obtain the best results. Note that both of the Optilux™ products are recommended for use on open weaved fabrics such as 100% cotton or poly/ cotton blends. The use of these products on very tightly woven fabrics such as shell nylon is not recommended because the inks cannot soak into a tightly woven fabric as well as they can on a more open fabric and this can greatly limit reflectivity. It is extremely important, in order to obtain the best results when using the Optilux™ direct print products, that the inks always be thoroughly stirred prior to each use. The reason for this is that the reflective beads can settle in the container when the inks are stored for any length of time and if not stirred before each use, the reflective bead distribution will not be even and this can limit reflectivity. For Optilux™ 505 the recommended screen meshes to use are 110 t/in to 230 t/in (43 t/cm to 90 t/cm) monofilament. The best mesh to use in most cases is around a 156 t/in (62 t/cm). This will give you good opacity and good reflectivity. A higher mesh count makes the reflective ink much more subtle and less opaque. All of the Optilux™ direct print products are very low in viscosity (how thick or thin the ink looks in a liquid state) and this is part of why the inks work so well. The lower viscosity of these products allow for part of the ink to sink into the garment or fabric as it is being cured and this allows the reflective bead to be exposed properly which allows the ink to reflect well when a focused beam of light is aimed at the printed and cured ink. (See figure 1).
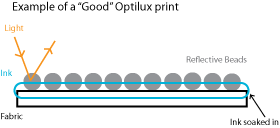
Figure 1 - "Good" Optilux Print
Do not modify these inks with any thickeners or thinners. You also do not want to use any under base when printing the Optilux™ products as the under base will not allow the ink to sink into the fabric and you will lose reflectivity or the ink may not reflect at all. In the same respect, you do not want to lay down so much ink that the reflective beads become covered by excess ink that cannot soak into the fabric. (See figure 2) The tendency of printers, in order to obtain greater opacity when using the Optilux™ 505, is to do more print passes and this is not what should be done.

Figure 2 - "Bad" Optilux Print
비드의 성질을 충분히 이해하면 반드시 따라야할 원칙이지만 쉬운 방안이 없다. 친수성 바인더에 비즈를 혼합하여 프린트하면 나쁜예의 방법으로 비즈를 부착시키게 된다.
The best procedure when printing by hand for obtaining more opacity when using the Optilux™ 505 is to flood the screen evenly (not too much pressure on the flood stroke or you may get an image blur) and then do a firm, but even print stroke. Use a 60-70 durometer with a sharp edge at about a 45° angle and a little off contact so you get a good clean print and shear the ink cleanly from the screen. If after the first print you think the print needs to be a little more opaque, and then do another print, but do not flood the screen on this print stroke. The idea is to not lay down so much ink that the reflective beads are covered, but to improve the opacity by laying a thin coat on top of the first coat. If you are using an automatic, then you just need to choose the right screen mesh, adjust your squeegee pressure and angle (about 45°), off-contact, and stroke speed of the squeegee to obtain the best print for the design or effect you want. A double hit on the automatic, if needed but not recommended, would require the use of another screen, possibly a 230 t/in (90 t/cm) mesh printed on top of the fist print (testing required to see what gives the best result).
Note again that both of the Optilux™ inks are very low in viscosity (very runny to some when compared to a typical plastisol ink) and may drip through the screen mesh if the ink is left in the image area between prints or from the corners of the screen if the screen is not taped properly. The image area (the open part of the screen) should be relatively clean of reflective ink after completing the print stroke.
Optilux™ 507 was formulated to give better opacity and a different look than Optilux™ 505 when doing, in particular, one color prints. The Optilux™ 507 has enhanced opacity because it also contains a very small metallic flake which helps with opacity. Properly printed and cured, Optilux™ 507 will be more opaque and will appear more like a silver shimmer type ink under normal lighting conditions, but will reflect very well when exposed to a focused beam of light, such as that from a flashlight or car headlights. The printing procedures for the Optilux™ 507 are much the same as with the Optilux™ 505, but a more open mesh should be used.
The recommended screen mesh when printing Optilux™ 507 is a 110 t/in (43 t/cm) monofilament mesh. The reason for using a little more open mesh with this product is to obtain more opacity and to allow the ink to pass through the screen mesh properly because of the small metallic flakes that are also in this ink. When trying a finer mesh, it is not recommended to go higher than a 156 t/in (62 t/cm) for printing the Optilux™ 507 and this should be tested first to make sure it meets your needs in terms of opacity and reflectivity. The other printing parameters, excluding the difference in the screen mesh used, are the same as when printing the Optilux™ 505. The printer should also not need to use another pass or print stroke when using the Optilux™ 507.
When using either of the Optilux™ products for the first time, it is important that a few test prints are done in order to develop the best technique for one’s particular equipment and printing skills. If printing a multi-color job, the Optilux™ products should be printed last in the design of flashed cured if printed earlier in the design (really best if printed last in most cases). Both of the Optilux™ products require the use of Optilux™ Coupler 100. The reason for this is that the coupler helps the ink hold onto the reflective bead that is in the ink and this means the Optilux™ products will have good wash durability when properly dosed with coupler, printed and cured. Mix the Optilux™ Coupler 100 thoroughly into the ink before use. The recommended usage is: By weight: 1 Gram of Optilux™ Coupler 100 to 20 Grams of Optilux™ 505 or 507 ink. Pot life of the mixed ink is approximately 8 to 12 hours. Do not mix more ink than is needed for the job. Any mixed ink (coupler and ink) not used within 12 hours should not be used again. The Optilux™ direct print products require a 325° (163° C) cure (entire ink film) and the time in dryer will vary with the type of dryer used. As always, wash tests should be performed to help insure proper application of these products. For best long term wash durability of the printed fabric, machine wash the finished product in cold water, delicate cycle and wash inside out. Do not use bleach or extremely harsh detergents. It is recommended that the garments are line dried or hanged to dry. The Optilux™ products, 505 or 507, can be used in assorted ways to help produced some new looks which can also help with nighttime visibility or to create unique hidden designs which really only show up when hit with a directed beam of light. Experiment, run some trial prints and by all means use your creativity to see what you can come up with.
Same design printed in black ink and Optilux 505 for a subtle reflective effect For more on our Optilux™ Reflectives, go to http://www.iccink.com/optilux/index.htm. To access the product bulletin for Optilux™ 505 or 507, please go to our product bulletins page: http://www.iccink.com/screenprint/productbulletins.htm.